How to adjust brightness and color in a video online
How to adjust brightness and color in a video online
Updated on
Great news! If you have footage that looks too dark, overexposed, or washed out (or a series of clips that were shot in different lighting conditions and don't match), you don't need a dedicated color correction tool to fix it.
In elevate.io, you can adjust brightness, contrast, saturation, and white balance directly in your browser. This guide covers how to use the colour controls to correct specific problems and make your footage look visually consistent before you publish.
For deeper product detail on the color change workflow, the "How to change the color of a video page” in the elevate.io learn section covers the mechanics concisely alongside this guide.
Open elevate.io in your browser
What is the difference between brightness, contrast, and color correction?
These three controls do different things and are worth understanding before you start:
Brightness controls how light or dark the overall image is. Increase it to lift a dark clip; reduce it if the footage is overexposed or too bright.
Contrast controls the difference between the lightest and darkest areas of the image. Low contrast looks flat and grey; higher contrast looks punchy but can clip highlights if pushed too far.
Color correction fixes unwanted color casts (footage that looks too warm, too cool, or tinted from mixed lighting) so it appears natural and consistent with other clips in the sequence.
All three are adjustable in the same panel in elevate.io: the Video tab in the Inspector panel on the right side of the editor.
How to adjust brightness and contrast in a video in elevate.io
Open elevate.io in your browser and sign in, or create a free account
Click the blue
+ Create projectbutton in the top right of your workspaceUpload your video clip to the media panel
Drag the clip onto the timeline
Click the clip to select it, then open the Video tab in the Inspector panel on the right side of the editor
Go to the Color panel and the Brightness & contrast section
Use the Contrast slider to increase or reduce the difference between the lightest and darkest areas
For more precise control, hold Shift while dragging any slider
Preview the clip to check how it looks against the other clips in your sequence. Switch the toggle next to Color on and off to see the before and after.
Export your video from the top right of the editor when you're happy with the result
Start color correcting in your browser — no download needed
How to color correct a video in elevate.io
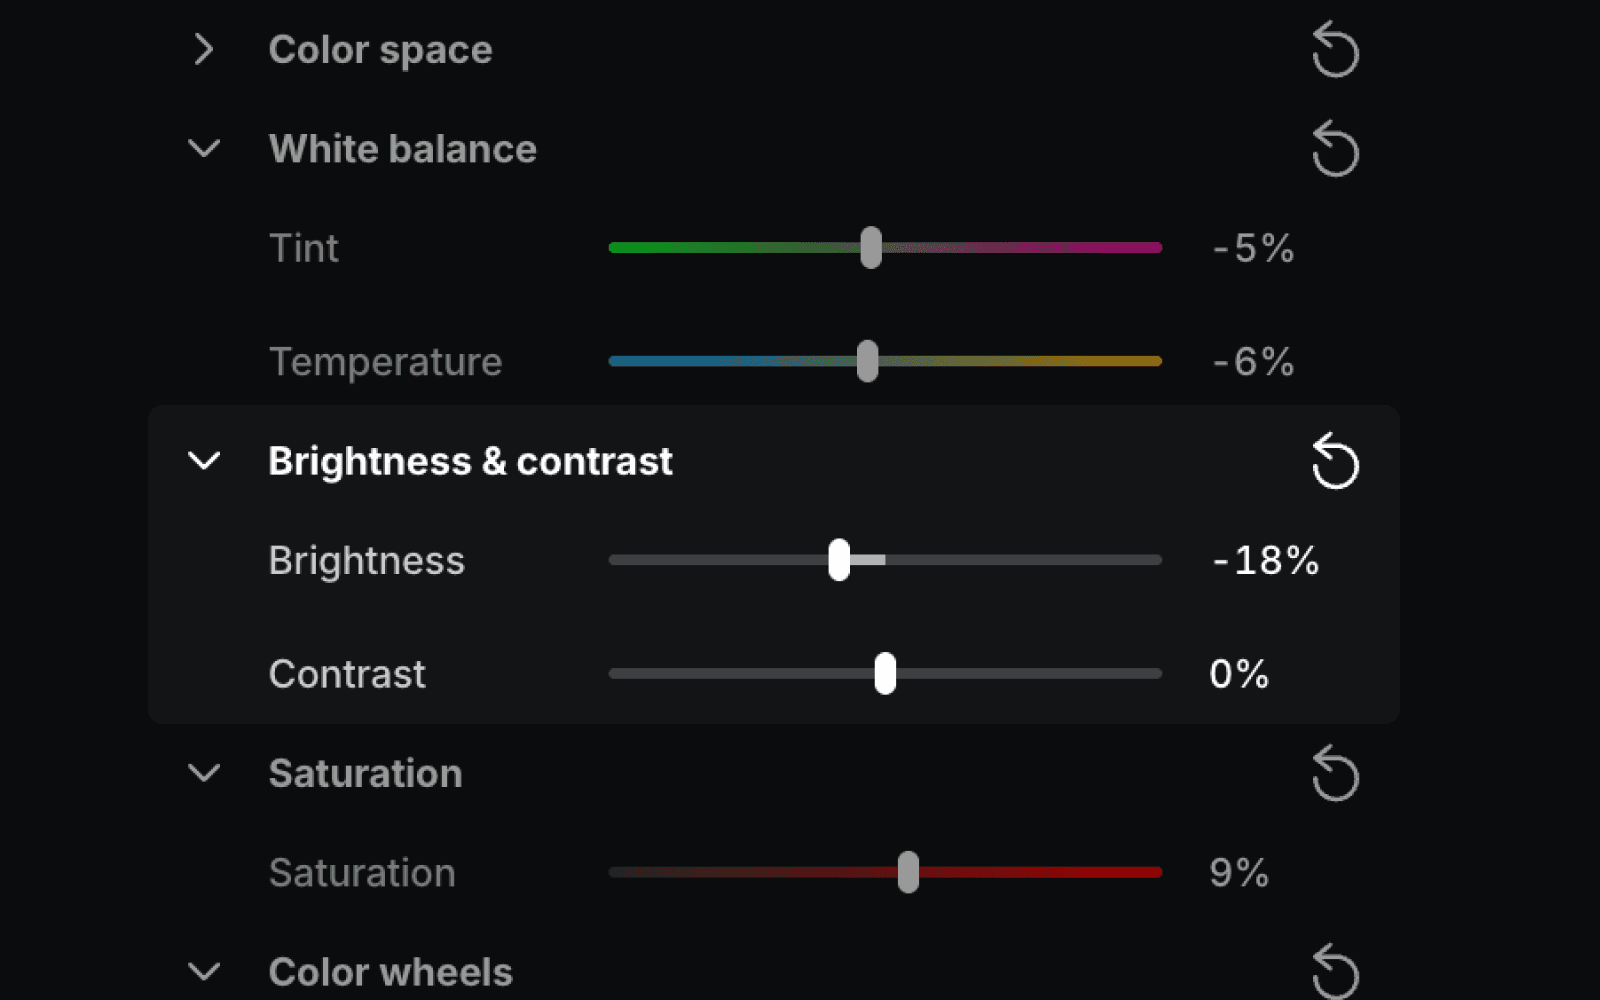
Color correction uses the same Video tab and Inspector panel as the Brightness and Contrast controls. The color-specific controls sit in the White Balance and Saturation sections of the panel.
Select your clip on the timeline and open the Video tab in the Inspector panel
In the White Balance section, use the Temperature slider to shift the color from cool (blue) to warm (orange). Move it towards warm if footage looks too blue, towards cool if it looks too orange
Use the Tint slider to correct green or magenta color casts from fluorescent or mixed lighting
In the Saturation section, use the Saturation slider to increase the vibrancy of colors or reduce it for a more muted look
Preview the clip and compare it with the surrounding footage to check the color feels consistent. Switch the toggle next to Color on and off to see the before and after
Repeat for any other clips in the sequence that need matching
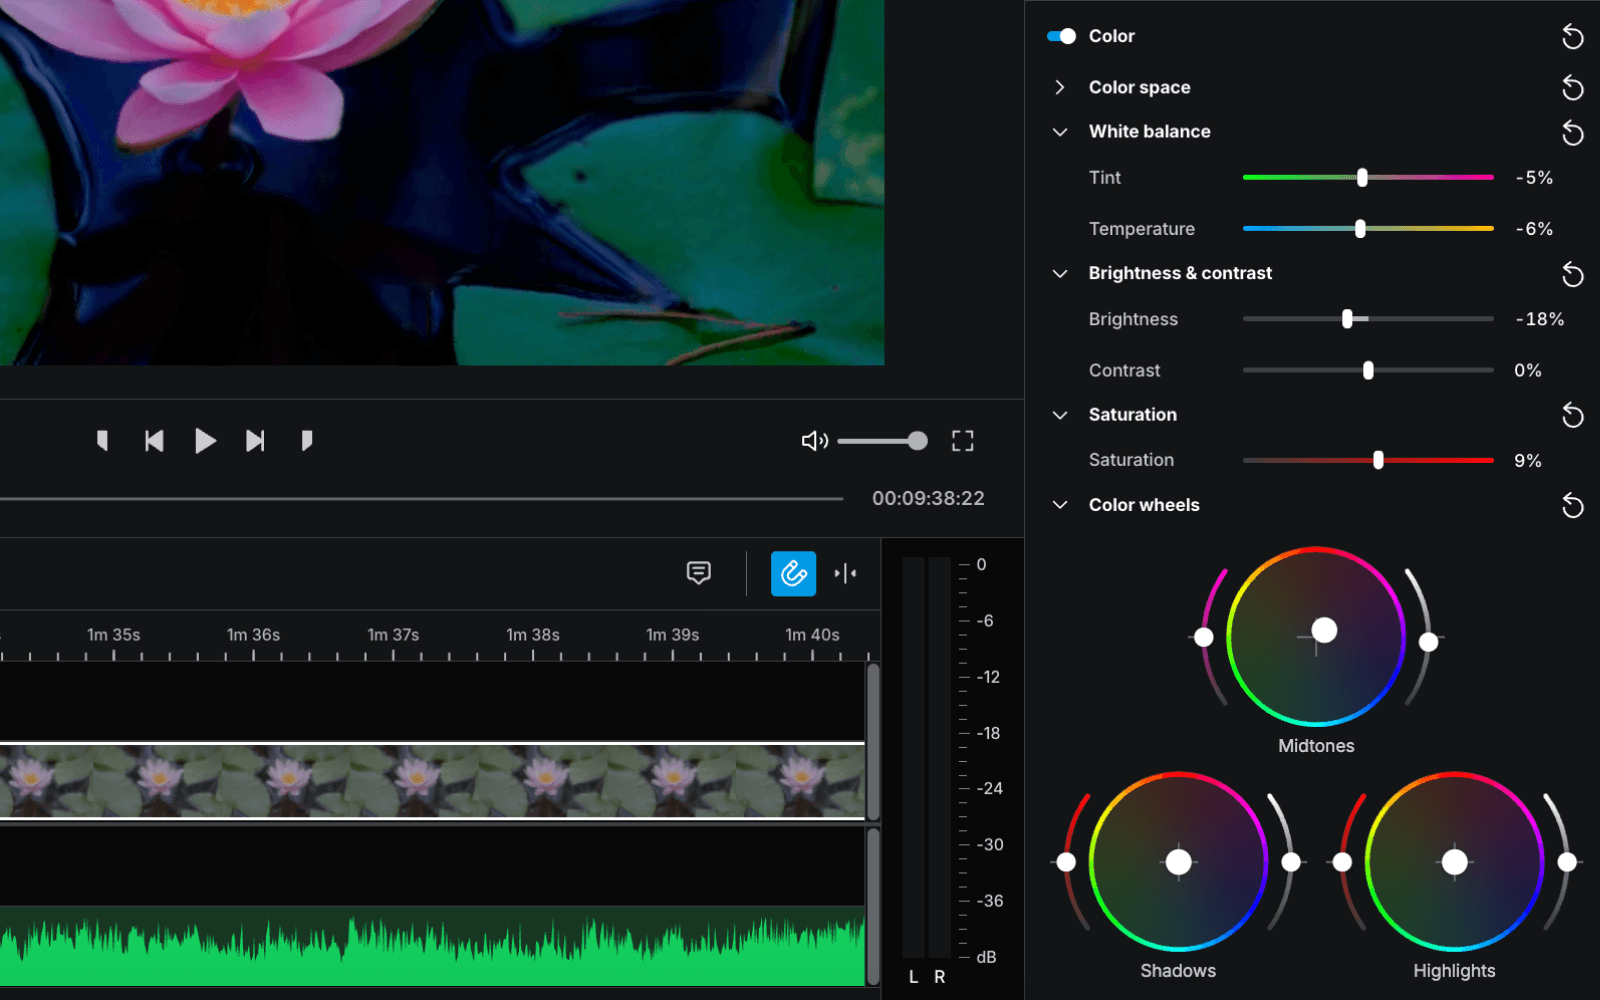
For readers who want to take color further, color grading with LUTs is available in the Looks panel, a fast way to apply a cinematic or stylized grade across your footage in one click. There are also Color wheels below the color correction section for color grading. Where you can independently adjust the shadows, midtones, and highlights to craft a specific mood, cinematic style or emotional tone.
When would you adjust brightness or color in a video?
Common scenarios where brightness and color correction makes a real difference before publishing:
Lifting a dark clip shot in poor indoor lighting, a common issue with product demos or interviews recorded on a laptop webcam
Recovering overexposed footage from a sunny outdoor shoot, reducing brightness and contrast to bring back detail in the highlights
Fixing a color cast from fluorescent or mixed lighting. Office or classroom footage often has a green or cool tint that looks unnatural on screen
Making a series of clips look visually consistent. Footage shot on different devices or in different rooms needs matching before it can be cut together convincingly
Giving branded content a consistent look across social channels, adjusting saturation and temperature to keep a series of videos feeling visually coherent
Correcting footage shot on different cameras. Different devices have different default white balance settings that need correcting to match
Frequently asked questions
How do I fix dark or overexposed video online?
In elevate.io, select the clip on the timeline and open the Video tab in the Inspector panel. In the Brightness & contrast section in the Color panel, drag the Brightness slider right to lift a dark clip or left to reduce overexposure. You can also adjust Contrast to bring back detail in the highlights or shadows. Hold Shift while dragging for more precise control.
What is color correction and do I need it?
Color correction is the process of adjusting the brightness, contrast, white balance, and saturation of a video clip so it looks natural and consistent with the footage around it. If your video looks too dark, too warm, too cool, or visually inconsistent between clips, color correction will fix it. Most video shot on phones or webcams benefits from at least a small brightness or white balance adjustment before publishing.
Can I adjust brightness and colour without affecting video quality?
Yes. Color and brightness adjustments in elevate.io are non-destructive. They change how the clip looks on export without altering the original file. The video will export at the same resolution and quality regardless of any color or brightness adjustments made in the editor.
What is the difference between color correction and color grading?
Color correction fixes problems. It makes footage look natural and consistent. Color grading is a creative step that comes after correction. It gives footage a specific look or mood, such as a warm cinematic tone or a cool, desaturated feel. elevate.io supports both: the brightness, contrast, and white balance controls handle correction, Color wheels and the Looks panel handles grading with built-in LUT presets.
Fix your footage in under a minute
Adjusting brightness and colour in elevate.io takes a few seconds: open it in your browser, upload your clip, select it on the timeline, and use the Color controls in the Video tab to correct the look. No download, no specialist knowledge, and it works on any device. Open elevate.io now and get started!
Great news! If you have footage that looks too dark, overexposed, or washed out (or a series of clips that were shot in different lighting conditions and don't match), you don't need a dedicated color correction tool to fix it.
In elevate.io, you can adjust brightness, contrast, saturation, and white balance directly in your browser. This guide covers how to use the colour controls to correct specific problems and make your footage look visually consistent before you publish.
For deeper product detail on the color change workflow, the "How to change the color of a video page” in the elevate.io learn section covers the mechanics concisely alongside this guide.
Open elevate.io in your browser
What is the difference between brightness, contrast, and color correction?
These three controls do different things and are worth understanding before you start:
Brightness controls how light or dark the overall image is. Increase it to lift a dark clip; reduce it if the footage is overexposed or too bright.
Contrast controls the difference between the lightest and darkest areas of the image. Low contrast looks flat and grey; higher contrast looks punchy but can clip highlights if pushed too far.
Color correction fixes unwanted color casts (footage that looks too warm, too cool, or tinted from mixed lighting) so it appears natural and consistent with other clips in the sequence.
All three are adjustable in the same panel in elevate.io: the Video tab in the Inspector panel on the right side of the editor.
How to adjust brightness and contrast in a video in elevate.io
Open elevate.io in your browser and sign in, or create a free account
Click the blue
+ Create projectbutton in the top right of your workspaceUpload your video clip to the media panel
Drag the clip onto the timeline
Click the clip to select it, then open the Video tab in the Inspector panel on the right side of the editor
Go to the Color panel and the Brightness & contrast section
Use the Contrast slider to increase or reduce the difference between the lightest and darkest areas
For more precise control, hold Shift while dragging any slider
Preview the clip to check how it looks against the other clips in your sequence. Switch the toggle next to Color on and off to see the before and after.
Export your video from the top right of the editor when you're happy with the result
Start color correcting in your browser — no download needed
How to color correct a video in elevate.io
Color correction uses the same Video tab and Inspector panel as the Brightness and Contrast controls. The color-specific controls sit in the White Balance and Saturation sections of the panel.
Select your clip on the timeline and open the Video tab in the Inspector panel
In the White Balance section, use the Temperature slider to shift the color from cool (blue) to warm (orange). Move it towards warm if footage looks too blue, towards cool if it looks too orange
Use the Tint slider to correct green or magenta color casts from fluorescent or mixed lighting
In the Saturation section, use the Saturation slider to increase the vibrancy of colors or reduce it for a more muted look
Preview the clip and compare it with the surrounding footage to check the color feels consistent. Switch the toggle next to Color on and off to see the before and after
Repeat for any other clips in the sequence that need matching
For readers who want to take color further, color grading with LUTs is available in the Looks panel, a fast way to apply a cinematic or stylized grade across your footage in one click. There are also Color wheels below the color correction section for color grading. Where you can independently adjust the shadows, midtones, and highlights to craft a specific mood, cinematic style or emotional tone.
When would you adjust brightness or color in a video?
Common scenarios where brightness and color correction makes a real difference before publishing:
Lifting a dark clip shot in poor indoor lighting, a common issue with product demos or interviews recorded on a laptop webcam
Recovering overexposed footage from a sunny outdoor shoot, reducing brightness and contrast to bring back detail in the highlights
Fixing a color cast from fluorescent or mixed lighting. Office or classroom footage often has a green or cool tint that looks unnatural on screen
Making a series of clips look visually consistent. Footage shot on different devices or in different rooms needs matching before it can be cut together convincingly
Giving branded content a consistent look across social channels, adjusting saturation and temperature to keep a series of videos feeling visually coherent
Correcting footage shot on different cameras. Different devices have different default white balance settings that need correcting to match
Frequently asked questions
How do I fix dark or overexposed video online?
In elevate.io, select the clip on the timeline and open the Video tab in the Inspector panel. In the Brightness & contrast section in the Color panel, drag the Brightness slider right to lift a dark clip or left to reduce overexposure. You can also adjust Contrast to bring back detail in the highlights or shadows. Hold Shift while dragging for more precise control.
What is color correction and do I need it?
Color correction is the process of adjusting the brightness, contrast, white balance, and saturation of a video clip so it looks natural and consistent with the footage around it. If your video looks too dark, too warm, too cool, or visually inconsistent between clips, color correction will fix it. Most video shot on phones or webcams benefits from at least a small brightness or white balance adjustment before publishing.
Can I adjust brightness and colour without affecting video quality?
Yes. Color and brightness adjustments in elevate.io are non-destructive. They change how the clip looks on export without altering the original file. The video will export at the same resolution and quality regardless of any color or brightness adjustments made in the editor.
What is the difference between color correction and color grading?
Color correction fixes problems. It makes footage look natural and consistent. Color grading is a creative step that comes after correction. It gives footage a specific look or mood, such as a warm cinematic tone or a cool, desaturated feel. elevate.io supports both: the brightness, contrast, and white balance controls handle correction, Color wheels and the Looks panel handles grading with built-in LUT presets.
Fix your footage in under a minute
Adjusting brightness and colour in elevate.io takes a few seconds: open it in your browser, upload your clip, select it on the timeline, and use the Color controls in the Video tab to correct the look. No download, no specialist knowledge, and it works on any device. Open elevate.io now and get started!